on
[AWS] Creating a VPC without using the wizard
Creating a VPC without using the wizard
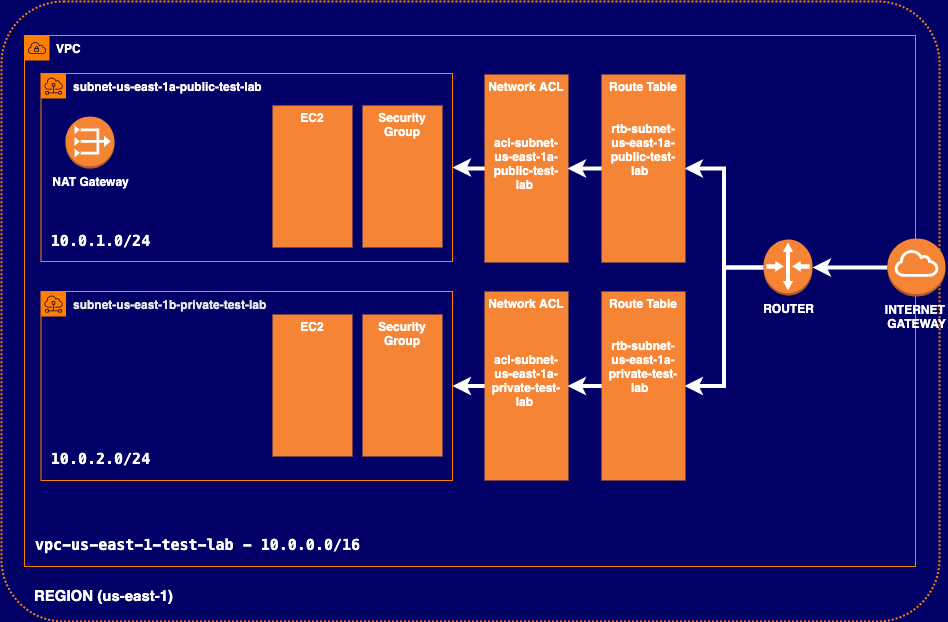
In this post we are going to create a VPC with a private and public subnet without using the wizard to get into VPC in detail and to know how it works internally.
You also can create your VPC using the wizard following the AWS tutorial Creating a VPC with Public and Private Subnets for Your Compute Environments

-
Open the AWS console and go to Services → Networking & Content Delivery section and make click on VPC.
-
On the left menu, in the VIRTUAL PRIVATE CLOUD section, click on Your VPCs option.
-
Click on the button that says Create VPC on the top side.
-
Fill the form that appears with the data below.
Name tag: vpc-us-east-1-test-lab
IPv4 CIDR block: 10.0.0.0/16
IPv6 CIDR block: Amazon provided IPv6 CIDR block
Tenancy: DefaultNote Be aware of the VPC description that appears in the form. A VPC is an isolated portion of the AWS cloud populated by AWS objects, such as Amazon EC2 instances. You must specify an IPv4 address range for your VPC. Specify the IPv4 address range as a Classless Inter-Domain Routing (CIDR) block; for example, 10.0.0.0/16. You cannot specify an IPv4 CIDR block larger than /16. You can optionally associate an IPv6 CIDR block with the VPC.
Note By default, when you create a custom VPC, the following components are created.
- A router
- A main route table
- A main ACL
- A main Security Group
-
On the VPC section, verify that the VPC was created successfully and then make click on Subnets on the left menu.
-
Click on the button that says Create subnet on the top side.
-
Fill the form that appears with the data below.
Name tag: subnet-us-east-1a-public-test-lab
VPC: vpc-us-east-1-test-lab
Availability Zone: us-east-1a
IPv4 CIDR block: 10.0.1.0/24
IPv6 CIDR block: Don’t Assign IPv6 -
Repeat the steps 5 and 6 in order to create a second subnet.
-
Fill the form that appears with the data below.
Name tag: subnet-us-east-1b-private-test-lab
VPC: vpc-us-east-1-test-lab
Availability Zone: us-east-1b
IPv4 CIDR block: 10.0.2.0/24
IPv6 CIDR block: Don’t Assign -
Go to the Subnet section and select subnet-us-east-1b-private-test-lab, then click on Actions button on the top side, then click on Modify auto-assign IP settings and finally select Auto-assign IPv4 option.
-
Go to the VPC Dashboard section and on the left menu click on Internet Gateways and then click on Create internet gateway on the top side.
-
Fill the form that appears with the data below.
Name tag: igw-vpc-us-east-1-test-lab
-
Attach the internet gateway to the VPC vpc-us-east-1-test-lab
-
Go to the VPC Dashboard section and on the left menu click on Route Tables and then click on Create route table on the top side.
-
Fill the form that appears with the data below.
Name tag: rtb-subnet-us-east-1a-public-test-lab
VPC: vpc-us-east-1-test-lab -
Repeat the steps 14 and 15 in order to create a route table for the private subnet.
Name tag: rtb-subnet-us-east-1b-private-test-lab
VPC: vpc-us-east-1-test-lab -
Select the route table rtb-subnet-us-east-1a-public-test-lab and on the bottom side select routes and then click on the Edit routes button.
-
Add the following rules and then click save.
Destination Target 0.0.0.0/0 igw-vpc-us-east-1-test-lab ::/0 igw-vpc-us-east-1-test-lab -
Select the route table rtb-subnet-us-east-1a-public-test-lab and on the bottom side select subnet associations and then click on Edit subnet associations, select subnet-us-east-1a-public-test-lab and save.
-
Create a NAT gateway associated with the subnet subnet-us-east-1a-public-test-lab and add a tag name as ng-subnet-us-east-1a-public-test-lab
-
Select the route table rtb-subnet-us-east-1b-private-test-lab and on the bottom side select routes and then click on the Edit routes button.
-
Add the following rules and then click save.
Destination Target 0.0.0.0/0 ng-subnet-us-east-1a-public-test-lab -
Select the route table rtb-subnet-us-east-1b-private-test-lab and on the bottom side select subnet associations and then click on Edit subnet associations, select subnet-us-east-1b-private-test-lab and save.
-
Go to the VPC Dashboard section and on the left menu click on Network ACLs and then click on Create network ACL on the top side.
-
Create two ACL one for the public subnet and another for the private subnet.
[ACL-1]
Name tag: acl-subnet-us-east-1a-public-test-lab
VPC: vpc-us-east-1-test-lab[ACL-2]
Name tag: acl-subnet-us-east-1b-private-test-lab
VPC: vpc-us-east-1-test-lab -
Associate each ACL with its corresponding subnet.
-
Add to each ACL the rules you need.
-
Create two Security Groups one for the public subnet and another for the private subnet.
[SG-1]
Security group name: sg-subnet-us-east-1a-public-test-lab
Description: Any description
VPC: vpc-us-east-1-test-lab[SG-2]
Security group name: sg-subnet-us-east-1b-private-test-lab
Description: Any description
VPC: vpc-us-east-1-test-lab
References and Resources